On the weekend of the 11
th a bunch of us came together to spend the first night(s) in the cabin. Even though there was no real roof, we threw a couple of tarps over the open spaces and slept in the cabin for the first time. This was the weekend of the Sandstone Quarry Days so we went into town and watched the parade and shopped the booths at the street bazaar. Mom and I went back home on Saturday while Dad and Ma (Mary) stayed up for another night.
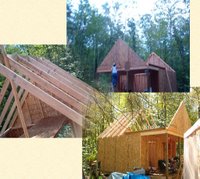
This past weekend, brother Dan joined Dad and I up at camp and together we put up the rafters. Since we only have two 6-foot ladders and no real scaffolding, we were forced to get creative. On a previous weekend, Dad and I had taken some of the rafter materials and used them to make a rudimentary scaffolding ramp to span the space from the loft edge to the back gable. We threw about 4 sheets of OSB upon this ramp to give us something to walk on. You can see it in the composite picture on the left. Then we made the decision to build the roof in 4 sections. We figured (and as it turns out correctly so) that that was about as big as we could handle by ourselves.
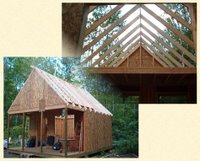
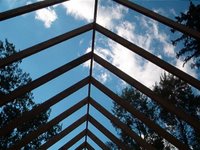
Dad notched the rafter bottoms to which we nailed 1x4 base plates so they would rest upon the wall top plate and then cut 45 degree angles in the rafter tops to receive a 1x6 crown plate. These we built up on the loft. Then while Dan manned the ladder below and Dad walked out across the scaffolding and I worked from the loft main, we walked the first of the back roof sections into place on top of the southwest-facing side wall and the back gable. Once we had it flushed down, we nailed it into place. Then we turned around and repeated the process for the northeast roof section. After that we had to make some adjustments to get things to fit properly and then we nailed the two 1x6 crown plates together. We did make sure to make 1 of the crown plates 2-feet longer than the other so we could create an overlap for the front roof sections. Finally, we dismantled our rudimentary scaffolding and created the 2 sections for the front repeating the process we had used for the rear roof sections. At last our rafters are up and ready to be sheeted.
 On the weekend of the 11th a bunch of us came together to spend the first night(s) in the cabin. Even though there was no real roof, we threw a couple of tarps over the open spaces and slept in the cabin for the first time. This was the weekend of the Sandstone Quarry Days so we went into town and watched the parade and shopped the booths at the street bazaar. Mom and I went back home on Saturday while Dad and Ma (Mary) stayed up for another night.
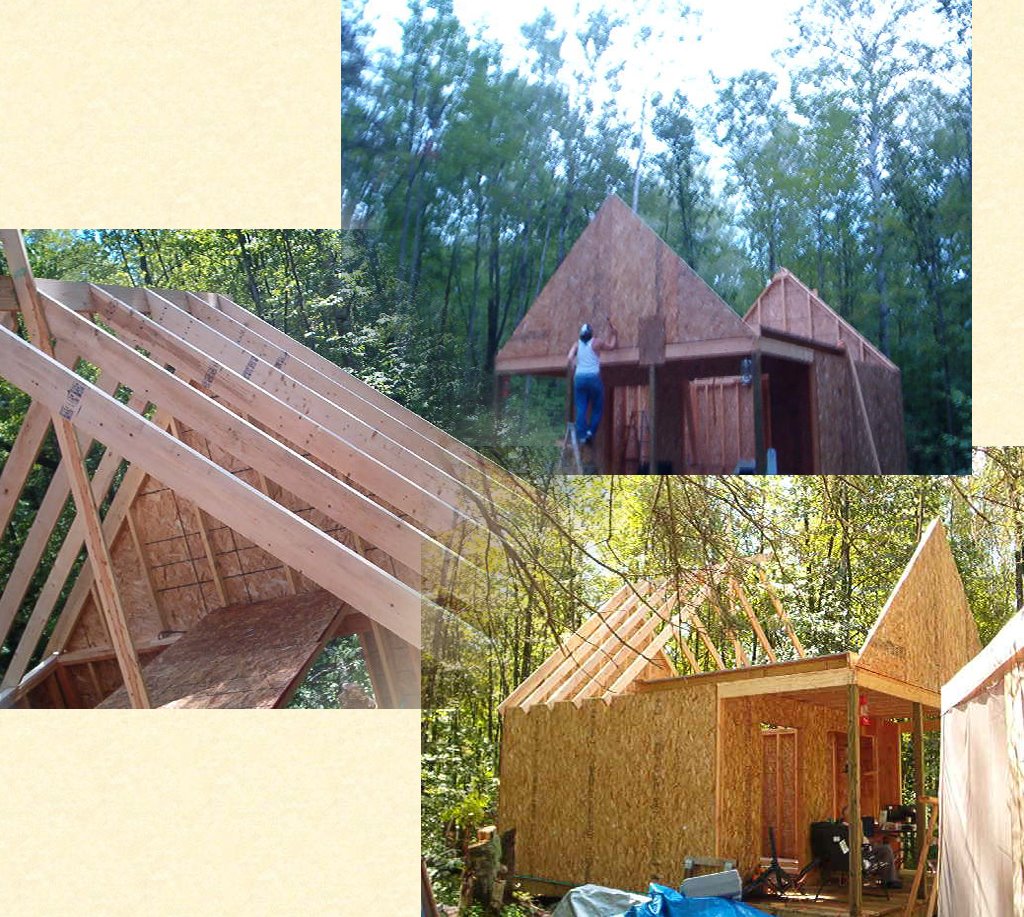 This past weekend, brother Dan joined Dad and I up at camp and together we put up the rafters. Since we only have two 6-foot ladders and no real scaffolding, we were forced to get creative. On a previous weekend, Dad and I had taken some of the rafter materials and used them to make a rudimentary scaffolding ramp to span the space from the loft edge to the back gable. We threw about 4 sheets of OSB upon this ramp to give us something to walk on. You can see it in the composite picture on the left. Then we made the decision to build the roof in 4 sections. We figured (and as it turns out correctly so) that that was about as big as we could handle by ourselves.
 Dad notched the rafter bottoms to which we nailed 1x4 base plates so they would rest upon the wall top plate and then cut 45 degree angles in the rafter tops to receive a 1x6 crown plate. These we built up on the loft. Then while Dan manned the ladder below and Dad walked out across the scaffolding and I worked from the loft main, we walked the first of the back roof sections into place on top of the southwest-facing side wall and the back gable. Once we had it flushed down, we nailed it into place. Then we turned around and repeated the process for the northeast roof section. After that we had to make some adjustments to get things to fit properly and then we nailed the two 1x6 crown plates together. We did make sure to make 1 of the crown plates 2-feet longer than the other so we could create an overlap for the front roof sections. Finally, we dismantled our rudimentary scaffolding and created the 2 sections for the front repeating the process we had used for the rear roof sections. At last our rafters are up and ready to be sheeted.
2 comments:
Hi Harvey,
I gotta tell you the camp site and cabin look like they’re coming along great. Every time I get an update to your blog I wish I could be there to help out with it. I’m using Office Outlook 2007 so I get automatic updates on blogs that I’ve subscribed to.
Anyway, I got a couple of thoughts about the roof of the cabin. I’ve also emailed Robert about these thoughts since he knows a lot more about roofing than I do. I don’t know if you have been keeping in touch with him about the construction of the roof being that he is a roofing professional but he might have a wealth of knowledge he can offer.
I am by far no expert on the subject but I thought I’d throw some thoughts your way. I’m a bit concerned about the use of a 1x6 for the crown plate at the top. I don’t know what the weight bearing requirements are but I personally would prefer a 2x6 for greater twist resistance and to keep the roof from bowing over time.
Also, I don’t know if you plan to leave the roof open on the inside or close it in, in which case you may need to consider ventilation if you haven’t already done so.
Finally, with the cabin being out in the woods I think you may want to consider an anti-algae shingle. your blog doesn’t say anything about the shingles or any other surface treatment (i.e. felt, ice & water and so on) but I would hate to see you get too far along and have to back step to correct a problem with the roofing aspect, especially with a highly qualified roofing professional in the family.
All in all though, I’m really impressed with all you’re doing out there. Keep up the great work. I can’t wait till I’m in a position where I can take some time to come out and visit you at Woodpecker Hollow.
Dave.
Dave, thanks for your comment. Actually, it's 2 1x6's laminated together.This way, it's even more strong than a single one, and we get to build the roof in sections using the 1x6s as top and bottom plates. The end result, is an engineered 2x6 that laps in the middle and still extends out past the front and back walls by a foot. Not much of an overhang, I know, but as we have to keep reminding ourselves here, it's just a cabin.
Post a Comment